Sunday 16 April 2017

Pineapple Top


When I spotted this amazing fabric from John Lewis, it was a definite must-have! I think it's one of the most awesome fabrics ever! I decided a wanted to make a top, and because the pineapple print is quite busy I didn't want it to seem like too much. I chose to do a Tilly and the Buttons contrast yoke Coco hack (you can find the tutorial here). I love the Coco pattern, and I've been wanting to do this hack for a while, and I think that this was the perfect opportunity. I paired the pineapple print with a lovely light grey jersey, also from John Lewis.
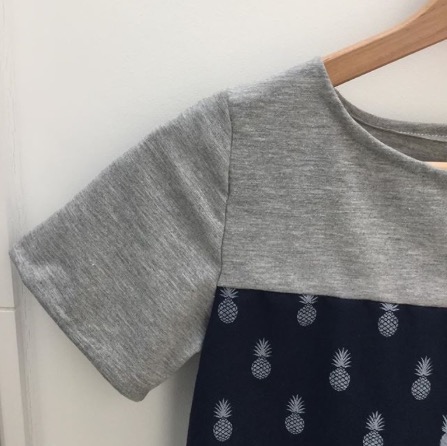


As with all of Tilly and the Buttons patterns and tutorials, this one was really easy to follow. The steps are very simple, and the whole top sewed together really quickly. Also, there wasn't any problem sewing the two different fabrics together, which was good, as jerseys and cottons don't always sew well together. It seems like I might finally be able to wear some of these summary makes, as the weather warms up, but I won't speak too soon!


The back is exactly the same as the front (apart from the front neckline being lower) so the only thing to take care of is matching up the bottom of the contrast yoke, although this isn't very difficult. Overall, I'm so happy with this top, I know I'll be wearing it all summer long!

Tuesday 4 April 2017

Nautical Tote Bag


Tote bags are one of my favourite things to sew, just because they are such a fast and satisfying make.  However, I've made so many, that there really don't need to be any more in my house! So birthdays are the perfect occasion for me to whip up a tote bag.


I really enjoyed making this, I think that my favourite part of making tote bags is choosing the fabric, as there is a contrast band around the top. I went to fabric land to choose the fabrics, and I found a really nice anchor print fabric to go with a denim. The lining is a really nice blue spotty fabric, which I like as it's brighter. I love when a lining contrasts the outer fabric.


I'm really pleased with this tote bag, it was fun to make, and I think it looks really nice. I'm looking forward to giving it to the inteneded receiver, I hope they like it!

Saturday 1 April 2017

Lavender Bag Tutorial


Lavender Bags have always been something that I've loved to make. I think its to do with how they always turn out well - even if they don't look perfect, you can still make your clothes smell heavenly with them! I came up with a way of making lavender bags smell nice and look nice, I hope you enjoy the tutorial!
You can make these lovely lavender bags as a gift for a friend, or maybe a sweetly scented treat just for you? Follow these simple steps to make your very own.


You will need:
  • Two different types of fabric (scraps are great)
  • Dried lavender
  • Ribbon and any extra embellishments


Step 1

Cut out two rectangles measuring 5cm x 7cm in your first fabric, and two 5cm x 7 cm in your second fabric, as well as four rectangles measuring 5cm x 8.5cm (two in each fabric). You should have four rectangles in your first fabric, and four in your second.


2010 - present


  • Step 2

    Put the rights sides of the same sized pieces of fabric together and sew two of the smaller rectangles (one in each fabric) to two of the bigger rectangles. You should have four large rectangles made out of eight smaller rectangles.


    Step 3

    Press out the seams using an iron and sew the two big rectangles with the two small rectangles. Do this with both sets of rectangles. You should have something that (hopefully!) looks like this...


    Step 4

    You should now have two rectangles. Sew them together like this:


    Step 5

    Fold over a fraction of the edge on each side of the rectangle, and sew down. 


    Step 6

    Fold over the top of the fabric (approx 1.5cm) and sew along the the fold. Your ribbon should be able to fit through!


    Step 7

    Fold the material in half and sew up one edge and the bottom. Make sure that you stop sewing before you reach the fold where your ribbon will fit through.


    Step 8

    Finally, fill 3/4 of the pouch with lavender and thread the ribbon through with a safety pin (about 30cm should do).


    Et Voila! You're very own lavender bag.